Working with Presets
Applying presets
At its most basic let’s, for example, make a fixture or group of fixtures go green. To apply a preset to a timeline you will need to select it and then click to drop it onto the timeline. Select the “Colour” preset and drop this onto the appropriate timeline row so that it starts at the required time, say at 0 seconds. A 10 second long red strip (the default length and colour) will appear already selected for manipulation via the Preset Properties pane on the right. “Colour” preset properties are limited to colour and timing, use the colour picker to select green and set a fade time and skew as required.If you have the Simulate window open you can now simply click Start and you’ll see these fixtures fade to green using the time and transition you have just entered and, after 10 seconds, fade back to black using the default release time of 2 seconds.
Presets can be moved and stretched on the timeline using the mouse to vary their start, end and length or alternatively you can type exact values into the Timing fields top right. Click View Transitions to display the fade and release timing graphically which can also be stretched using the mouse as an alternative to typing fade and release time values into the Timing pane.
So getting slightly more adventurous let’s say you want the fixtures to remain green for longer, say 20 seconds, and then fade to a rainbow effect. Firstly either drag the end of the green preset to 20 seconds on the timeline or set the end or length value to be 20 seconds via the Timing fields. Now select the “Rainbow Effect” preset and drop this onto the timeline immediately following the green preset (so it starts at 20 seconds) and set its period to be 2 seconds with a “Spread” offset type. Again, use the Simulate window to view this new programming (click Reset then Start).
Tip: Hold Shift while dragging for finer resolution (centisecond). Hold Ctrl (Cmd) while dragging to snap to the start/end of other placed presets.
Programmed groups, fixtures or elements - i.e. those with at least one preset applied - are shown in blue in the Browser, unprogrammed remain black.
NOTE: When adding presets to the timeline, the timelines rows will change appearance to indicate which rows the preset can be dropped on. Darker rows can have the preset dropped onto them, lighter rows cannot.
Pre-configuring a preset
You can configure a preset before applying it to a timeline. When you select the preset from the preset browser, you can set the parameters as discussed below. When you then add the preset to the timeline it will have these properties.
This allows you to drop multiple presets with the same parameters onto multiple timeline rows.
 Filtering Presets
The Preset browser displays all of the available presets of the requested type (Built-in, User etc.). The Built-in and User browsers can filter the available presets to make it easier to find the preset you are looking for.
The filter button beside the search lets you choose the types of preset (Groups, Pixel Matrix, VLC) to display in the browser.
Colour picker & user palette
The majority of presets allow you to select one or more colours and so the colour picker and user palette is used to select a colour either graphically or numerically, two modes are provided:
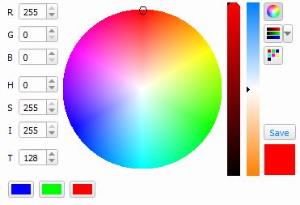
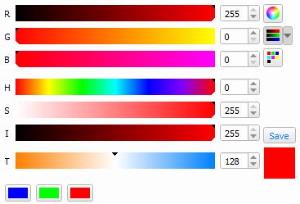
A user colour palette is available with the third button to the right of the colour picker. The palette comes pre-populated with the primary and secondary colours, along with black and white. To add your own colour simply mix it using the picker and click the Save button. This will store the colour within your user palette The user palette is stored with the project.
Variable White fixtures
The temperature slider takes effect on fixtures with warm white and cold white control channels and on fixtures with a single colour temperature channel.
Transparency
Some preset types support transparency. This is where one of the colours within the effect is specified as transparent, allowing whatever programming is running underneath to be seen. It is a very powerful feature allowing some very specific effects to be achieved that would otherwise be impossible.
However it also allows you to break some of the usual rules of Pharos playback and so it may need some extra thought or experimentation to get the result you are looking for. Here are some tips on how to get the best from this feature:
- Before using transparency make sure there isn't a way to achieve what you want using the existing opaque presets. If there is another way to get what you want then that may make life simpler. Use transparency for those very specific effects that cannot be achieved any other way.
- It can sometimes be difficult to make transparent effects behave tidily when a timeline loops. Use it in timelines that don't loop or hold at end when you can, or make a point of turning off the transparent effect before the point when it loops.
- It may be easier to get the result you want by using several timelines. Often problems can be avoided by having one timeline that contains the transparent effects and putting the background non-transparent effects into a separate timeline.
- When you are using multiple timelines, don't forget about the timeline priority setting. This can be a way of ensuring that transparent effects stay on top while you change the background underneath.
- Custom presets and more complex presets cannot have transparency encoded into them; this is only available to some of the in-built preset types.
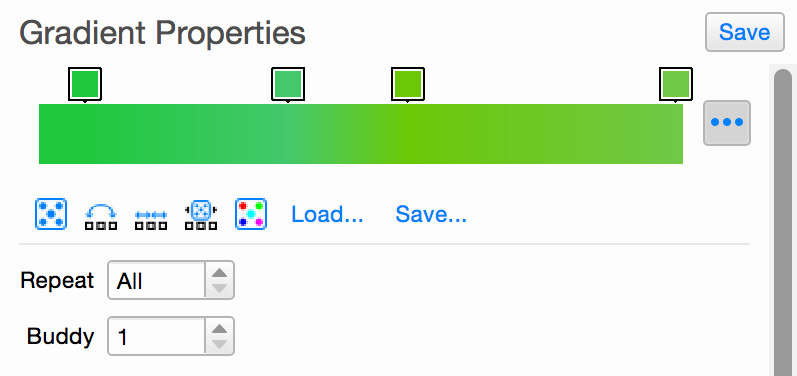
Gradient Options
When a preset includes a Gradient Property, additional properties can be shown using the advanced feature button ![]()
![]() Random - Will create a random gradient, and open some options to better specify the random gradient
Random - Will create a random gradient, and open some options to better specify the random gradient
![]() Reverse - Will flip the gradient horizontally
Reverse - Will flip the gradient horizontally
![]() Distribute - Will spread out the colour stops evenly
Distribute - Will spread out the colour stops evenly
![]() Randomise positions - Will set the colour stops to random positions, without changing the colours
Randomise positions - Will set the colour stops to random positions, without changing the colours
![]() Shuffle colours - Will randomly set the colours of the colour stops to one of the current colours without affecting the positions
Shuffle colours - Will randomly set the colours of the colour stops to one of the current colours without affecting the positions
Load - Allows you to load a saved gradient into the editor
Save - Allows you to save the gradient for future use
Random Gradient
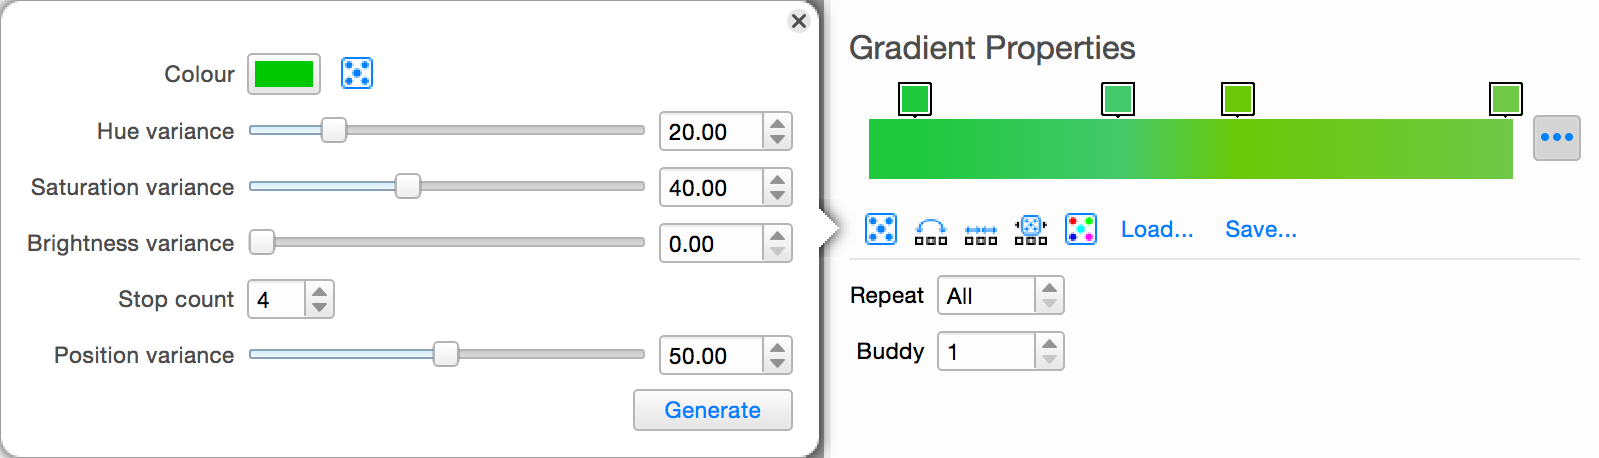
Colour - The seed colour for the random colour, can be randomised.
Hue variance - Maximum variance of the gradient colour's hue
Saturation variance - Maximum variance of the gradient colour's saturation
Brightness variance - Maximum variance of the gradient colour's brightness
Stop count - Number of colour stops in the gradient
Position variance - Variance of the position of the colour stops from an even distribution
Saving Presets
When you have created a preset with settings that you may want to reuse, you can save it to your User presets.
The Save button will store the settings for the current preset and allow you to rename the preset.
These saved User presets can be found in the User tab of the preset browser, and added to the timeline in the same way as the Built-in presets. Any saved preset is also stored as a file within your documents folder, this can be useful should you wish to transfer or share them; they can be found at the following locations:
- Windows: \Documents\Pharos Controls\Designer 2\Timeline Presets
- Mac: /Documents/Pharos Controls/Designer 2/Timeline Presets
Scenes
Scenes can be dropped onto the Scene rows at the required time to synchronise their control with the rest of the presentation.
Tip: Scene rows are automatically added when you add a Scene to a row so that you have an empty row.
NOTE: Scene rows have the lowest priority within a timeline, so programming applied to a fixture in the Group section will always override its programming within a Scene.
DALI presets
DALI presets can be dropped onto the DALI ballasts and groups for each DALI interface in the project, see DALI. DALI presets should be thought of as commands instructing the DALI ballasts or groups to fade to a level or scene with the ballasts retaining this level or scene indefinitely regardless of the state of the timeline. Unlike DMX fixtures, there exists no notion of a released, default state and so DALI ballasts must be explicitly turned off with a preset. Beware that timelines set to loop will repeatedly run any placed DALI presets and thus reissue these commands until the timeline is released.
Tip: It may be simpler to separate DALI programming onto dedicated timelines and use triggers to synchronize them to the other fixture programming.
Copying presets
Presets can be copied (right-click>Copy) from one position and pasted (right-click>Paste) into a different position on the same timeline, on another timeline in the project or in a timeline in a different project, this helps speed up the process of applying programming from one set of fixtures onto another; preset parameters, timing and transitions will all be copied. Note that copying presets in this way creates brand new instances of presets that operate independently of each other.
Tip: Hold Shift while selecting Paste to place the copy with fisner resolution (centisecond).
Linking presets
If, however, you want to add more fixtures to an existing preset so as to operate on them all as one then drag the top or bottom edge of that preset up or down to include more rows of fixtures, this operation creates a linked preset. Note that any skewed timing or effects within the preset will now be rendered over the new, larger fixture selection - use Repeat to compensate if required.
A linked preset can be unlinked if desired by using right-click>Unlink to yield separate, identical instances.
Only presets on fixtures or groups can be linked.
Deleting presets
Presets can be deleted by pressing Delete, Backspace or using right-click>Delete.
Selecting multiple presets
To select more than one preset at a time for moving and editing properties or timing hold Ctrl (Cmd) while clicking to build the selection or Ctrl (Cmd) + A to select all.